Installing a new car clock spring correctly is crucial for the proper functioning of various safety and electrical systems in your vehicle. As a supplier of car clock springs, I’ve seen firsthand the importance of a correct installation. In this blog, I’ll guide you through the process step – by – step, drawing on my years of experience in the industry. Car Clock Spring
Understanding the Car Clock Spring
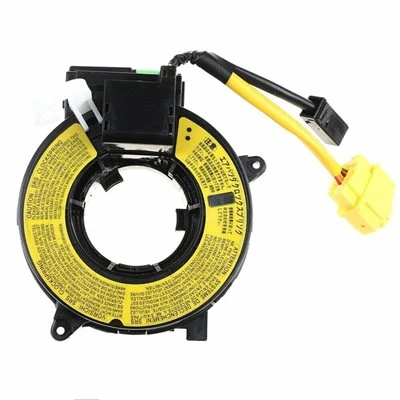
Before we start the installation process, it’s essential to understand what a car clock spring is and why it’s so important. A car clock spring is a spiral – wound ribbon of flat electrical cable that is housed in a plastic housing. It is located in the steering column assembly and allows electrical connections to be maintained between the steering wheel and the rest of the vehicle, even as the steering wheel is turned.
The clock spring is responsible for transmitting signals from various steering – wheel – mounted controls, such as the horn, airbag, cruise control, and audio controls. If the clock spring fails, these functions may stop working, and in the case of the airbag, it could pose a significant safety risk.
Pre – Installation Checks
- Vehicle Compatibility: Ensure that the clock spring you have purchased is compatible with your vehicle’s make, model, and year. Different vehicles have different clock spring designs, and using an incompatible one can lead to installation problems and malfunctions.
- Inspect the New Clock Spring: Before starting the installation, carefully inspect the new clock spring for any visible damage, such as broken wires, cracked housings, or loose connections. Any defective parts should be replaced immediately or returned to the supplier.
- Prepare the Necessary Tools: You will need a set of basic hand tools, including wrenches, sockets, and a steering wheel puller. It’s also a good idea to have a service manual for your vehicle, which can provide detailed instructions and diagrams specific to your car.
Installation Steps
Step 1: Disconnect the Battery
The first and most important step is to disconnect the negative terminal of the vehicle’s battery. This will prevent any electrical shocks or accidental deployment of the airbag during the installation process. Wait at least 15 minutes after disconnecting the battery to allow the airbag system to discharge completely.
Step 2: Remove the Steering Wheel
- Locate the Steering Wheel Mounting Bolts: These are usually located behind small covers on the back of the steering wheel. Use a small flat – head screwdriver to remove the covers.
- Loosen the Mounting Bolts: Use the appropriate socket or wrench to loosen the mounting bolts. Do not remove them completely at this stage.
- Use a Steering Wheel Puller: Attach the steering wheel puller to the steering wheel and tighten it according to the manufacturer’s instructions. This will help to safely remove the steering wheel from the steering column. Once the steering wheel is loose, carefully lift it off the column and set it aside.
Step 3: Remove the Old Clock Spring
- Locate the Clock Spring: The clock spring is typically located behind the steering wheel, inside the steering column assembly. It is usually held in place by a few screws or clips.
- Disconnect the Electrical Connectors: Carefully remove the electrical connectors from the old clock spring. Make sure to note the position and orientation of each connector to ensure proper reinstallation.
- Remove the Mounting Screws or Clips: Use a screwdriver or a suitable tool to remove the screws or clips that hold the clock spring in place. Once the fasteners are removed, gently lift the old clock spring out of the steering column.
Step 4: Install the New Clock Spring
- Center the New Clock Spring: Before installing the new clock spring, it is crucial to center it. Most clock springs have markings or indicators to help you align them correctly. Follow the instructions provided with the new clock spring to ensure proper centering.
- Insert the New Clock Spring: Carefully insert the new clock spring into the steering column, making sure it is seated properly. Align the mounting holes with the holes in the steering column and secure the clock spring with the screws or clips.
- Reconnect the Electrical Connectors: Connect the electrical connectors to the new clock spring, following the same orientation as they were on the old clock spring. Make sure the connections are secure.
Step 5: Reinstall the Steering Wheel
- Align the Steering Wheel: Place the steering wheel back on the steering column, aligning the splines. Make sure the steering wheel is in the correct position and centered.
- Tighten the Mounting Bolts: Use the appropriate socket or wrench to tighten the mounting bolts to the specified torque. Refer to your vehicle’s service manual for the correct torque value.
- Replace the Covers: Put the small covers back on the back of the steering wheel to cover the mounting bolts.
Step 6: Reconnect the Battery
Reconnect the negative terminal of the vehicle’s battery. Start the vehicle and test all the steering – wheel – mounted controls, such as the horn, airbag indicator light, cruise control, and audio controls. If any of the controls do not work, double – check the installation and the electrical connections.
Common Mistakes to Avoid
- Not Centering the Clock Spring: Failing to center the clock spring correctly can cause it to become over – wound or under – wound, leading to premature failure.
- Forgetting to Disconnect the Battery: Working on the steering column without disconnecting the battery can result in electrical shocks or accidental airbag deployment.
- Damaging the Electrical Connectors: Be careful when disconnecting and reconnecting the electrical connectors to avoid damaging them. A loose or damaged connector can cause intermittent or complete loss of function.
Why Choose Our Car Clock Springs
As a leading supplier of car clock springs, we offer high – quality products that meet or exceed OEM standards. Our clock springs are made from the finest materials and undergo rigorous testing to ensure reliability and durability.
We understand the importance of a correct installation, and that’s why we provide detailed installation instructions with every clock spring we sell. Our team of experts is also available to answer any questions you may have during the installation process.
If you’re in the market for a new car clock spring, we encourage you to contact us to discuss your specific needs. Whether you’re a professional mechanic or a DIY enthusiast, we can provide you with the right product at a competitive price.
Conclusion
Car Ignition Coil Installing a new car clock spring correctly is a critical task that requires careful attention to detail. By following the steps outlined in this blog and avoiding common mistakes, you can ensure the proper functioning of your vehicle’s safety and electrical systems. As a trusted supplier of car clock springs, we’re committed to providing you with the best products and support. If you have any questions or are interested in purchasing a car clock spring, don’t hesitate to reach out to us for more information and to start a procurement discussion.
References
- Automotive Service Excellence (ASE) study guides on steering and suspension systems.
- Service manuals of various car makes and models.
- Technical bulletins from leading automotive manufacturers.
Shanghai Changshun Imp.&Exp. Co., Ltd.
As one of the most professional car clock spring manufacturers and suppliers in China, we are committed to providing high quality OEM service to global clients. We warmly welcome you to buy premium car clock spring made in China here from our factory.
Address: No. 1558, Bai’an Road, Anting Town, Jiading District, Shanghai
E-mail: info@changhui-group.com
WebSite: https://www.changhuish.com/
